2x4 workbench plans: a sturdy bench from six boards and a sheet of plywood
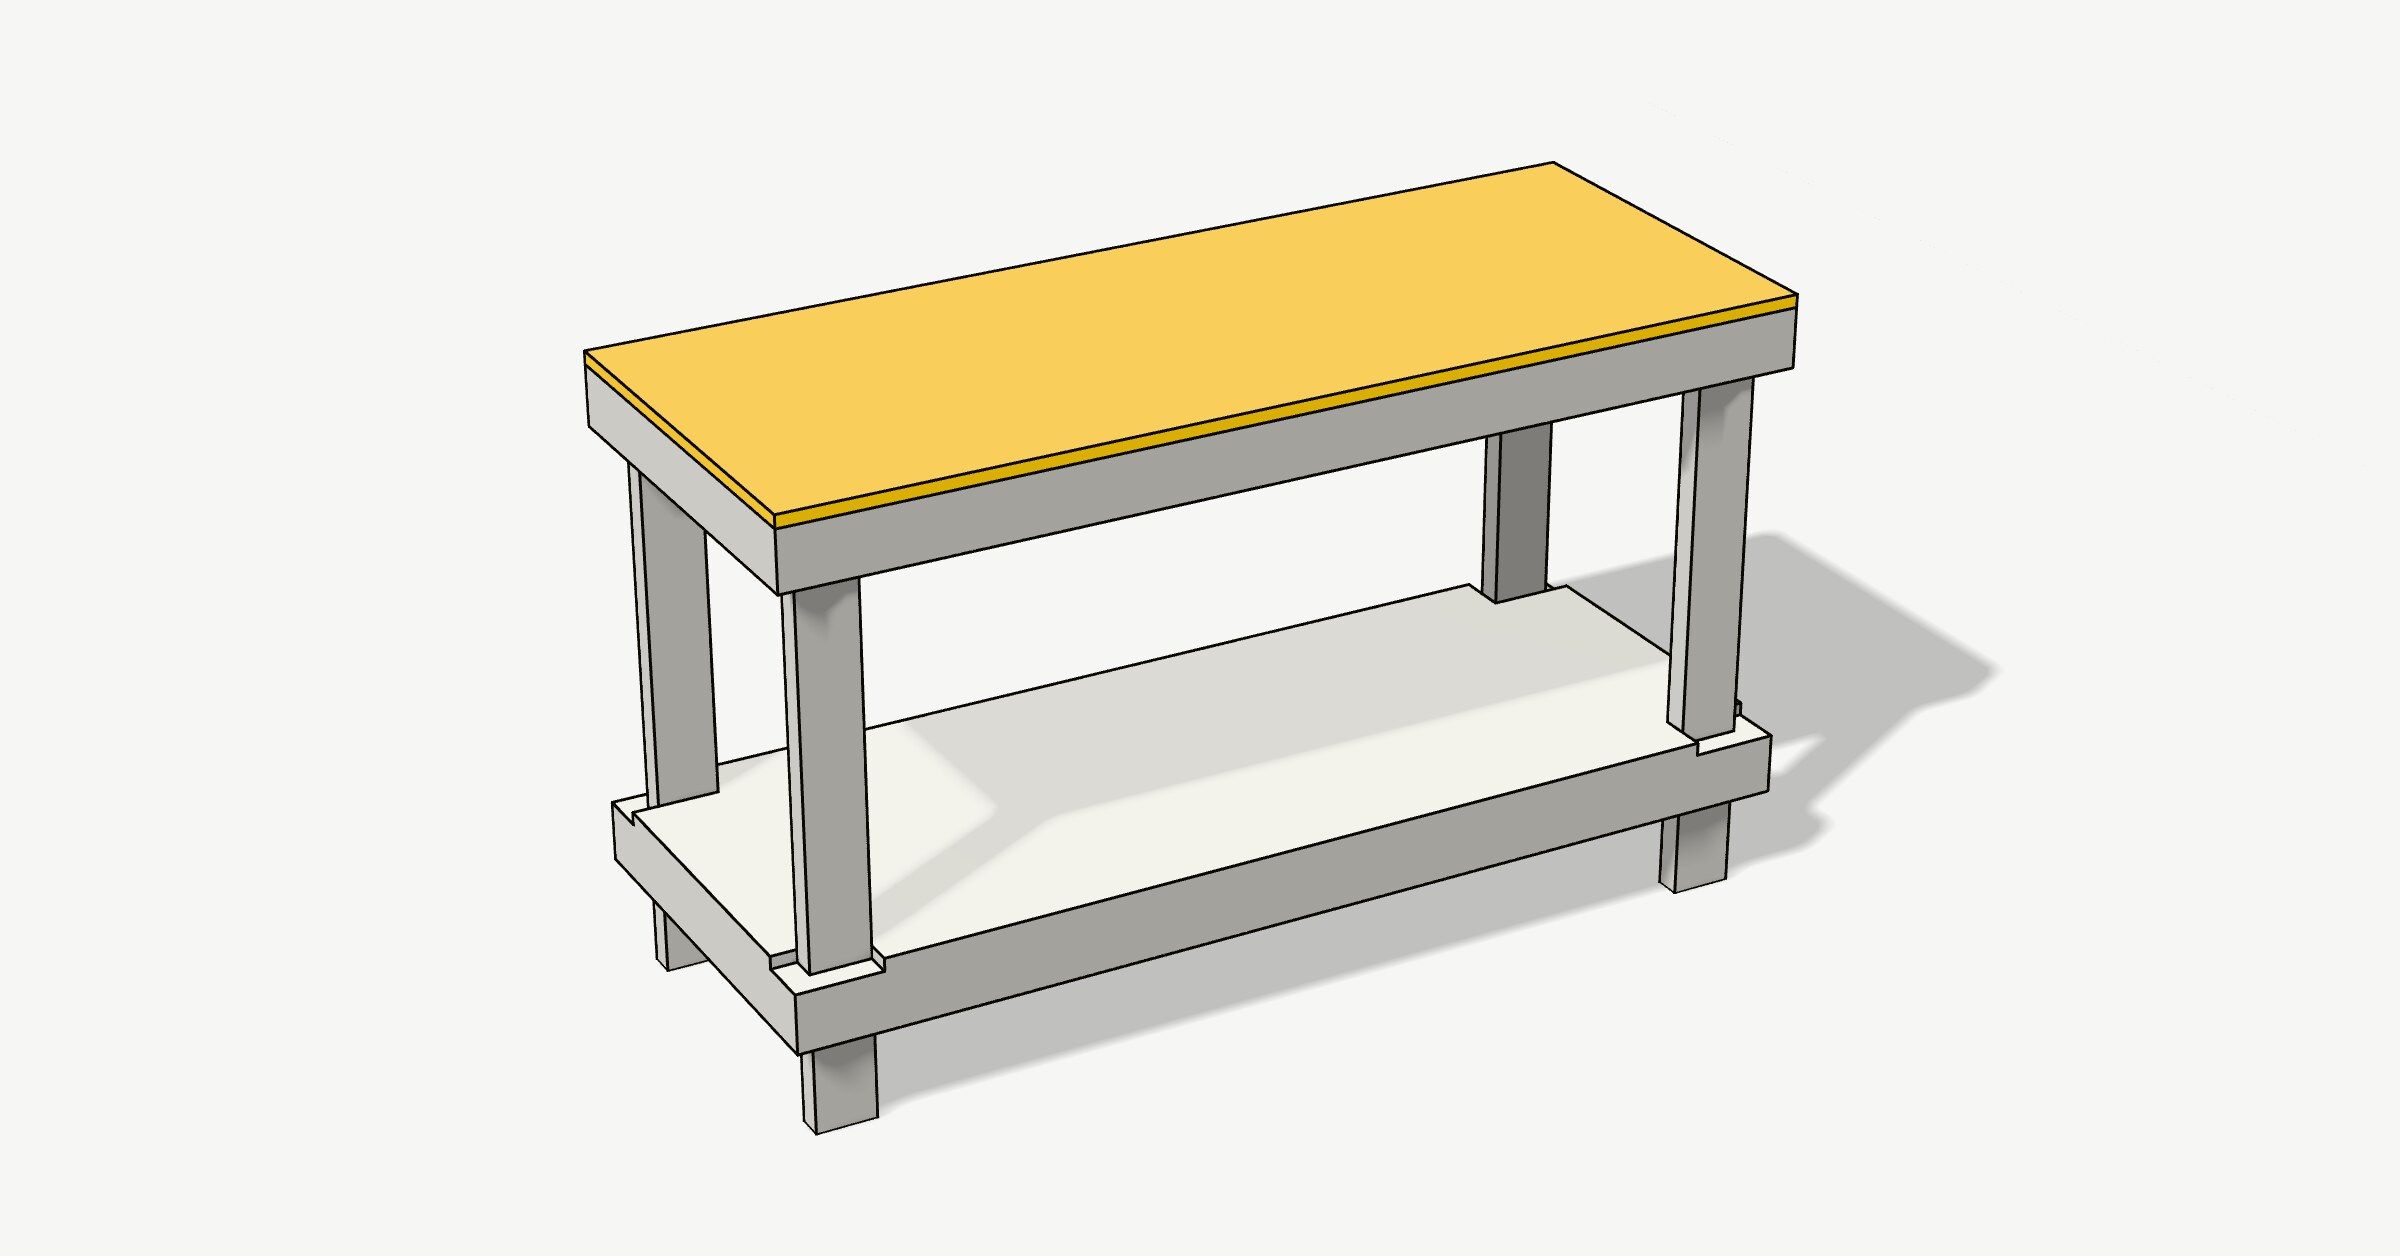
This is a workbench you can build in a garage with a saw and a drill: two frames of 2x4s with a leg in each corner, and one sheet of plywood cut in half for the top and the shelf. There are no joints to cut, only screws. The top is 60 by 24 inches and 36 inches off the floor, and the metric version, made from 45 × 95 mm studs, is 1500 × 600 mm and 900 mm high.
Screw the short rails between the long ones, on four blocks.
The notches leave room for the legs.
Each leg goes through a notch to the floor. Screw it to both rails.
Build it like the shelf frame, then fit it over the legs, flush at the top.
Line it up with the frame's edges.
Tip the bench a little and slide them out.
Press a step to play it, or drag the bench to turn it around. “Pull apart” spreads the parts out so you can see how they sit inside each other.
What you need
- 6 × 8 ft 2x4
- 1 × 4 × 8 ft sheet of 3/4 in plywood
- 24 × 3 in wood screws, for the rails
- 32 × 2 1/2 in wood screws, for the legs
- About 48 × 1 1/4 in wood screws, for the plywood
- Wood glue, if you want the frames stiffer still
- 6 × 2.4 m stud, 45 × 95 mm
- 1 × 1220 × 2440 mm sheet of 18 mm plywood
- 24 × 5 × 90 mm wood screws, for the rails
- 32 × 5 × 70 mm wood screws, for the legs
- About 48 × 4 × 35 mm wood screws, for the plywood
- Wood glue, if you want the frames stiffer still
For tools, you need a saw for the 2x4s (a mitre saw is quickest, but a circular saw or a handsaw does the job), a circular saw to rip the plywood in half, and a jigsaw for the four notches in the shelf. Add a drill with a countersink bit for pilot holes and a driver bit for the screws, a tape measure, a square and a pencil. Two clamps make the fourth step much easier.
Construction screws with a Torx head drive more easily than ordinary wood screws and don’t strip. Drill a pilot hole wherever a screw goes in near the end of a board, or the 2x4 will split.
Cut list
| Part | How many | Size | From |
|---|---|---|---|
| Long rails | 4 | 60 in | 2x4, two per frame |
| Short rails | 6 | 21 in | 2x4, three per frame |
| Legs | 4 | 35 1/4 in | 2x4 |
| Blocks | 4 | 6 in | 2x4 offcuts, to hold the shelf frame while you build |
| Top | 1 | 60 in × 24 in | 3/4 in plywood |
| Shelf | 1 | 60 in × 24 in | 3/4 in plywood, with a 5 in × 3 in notch cut from each corner |
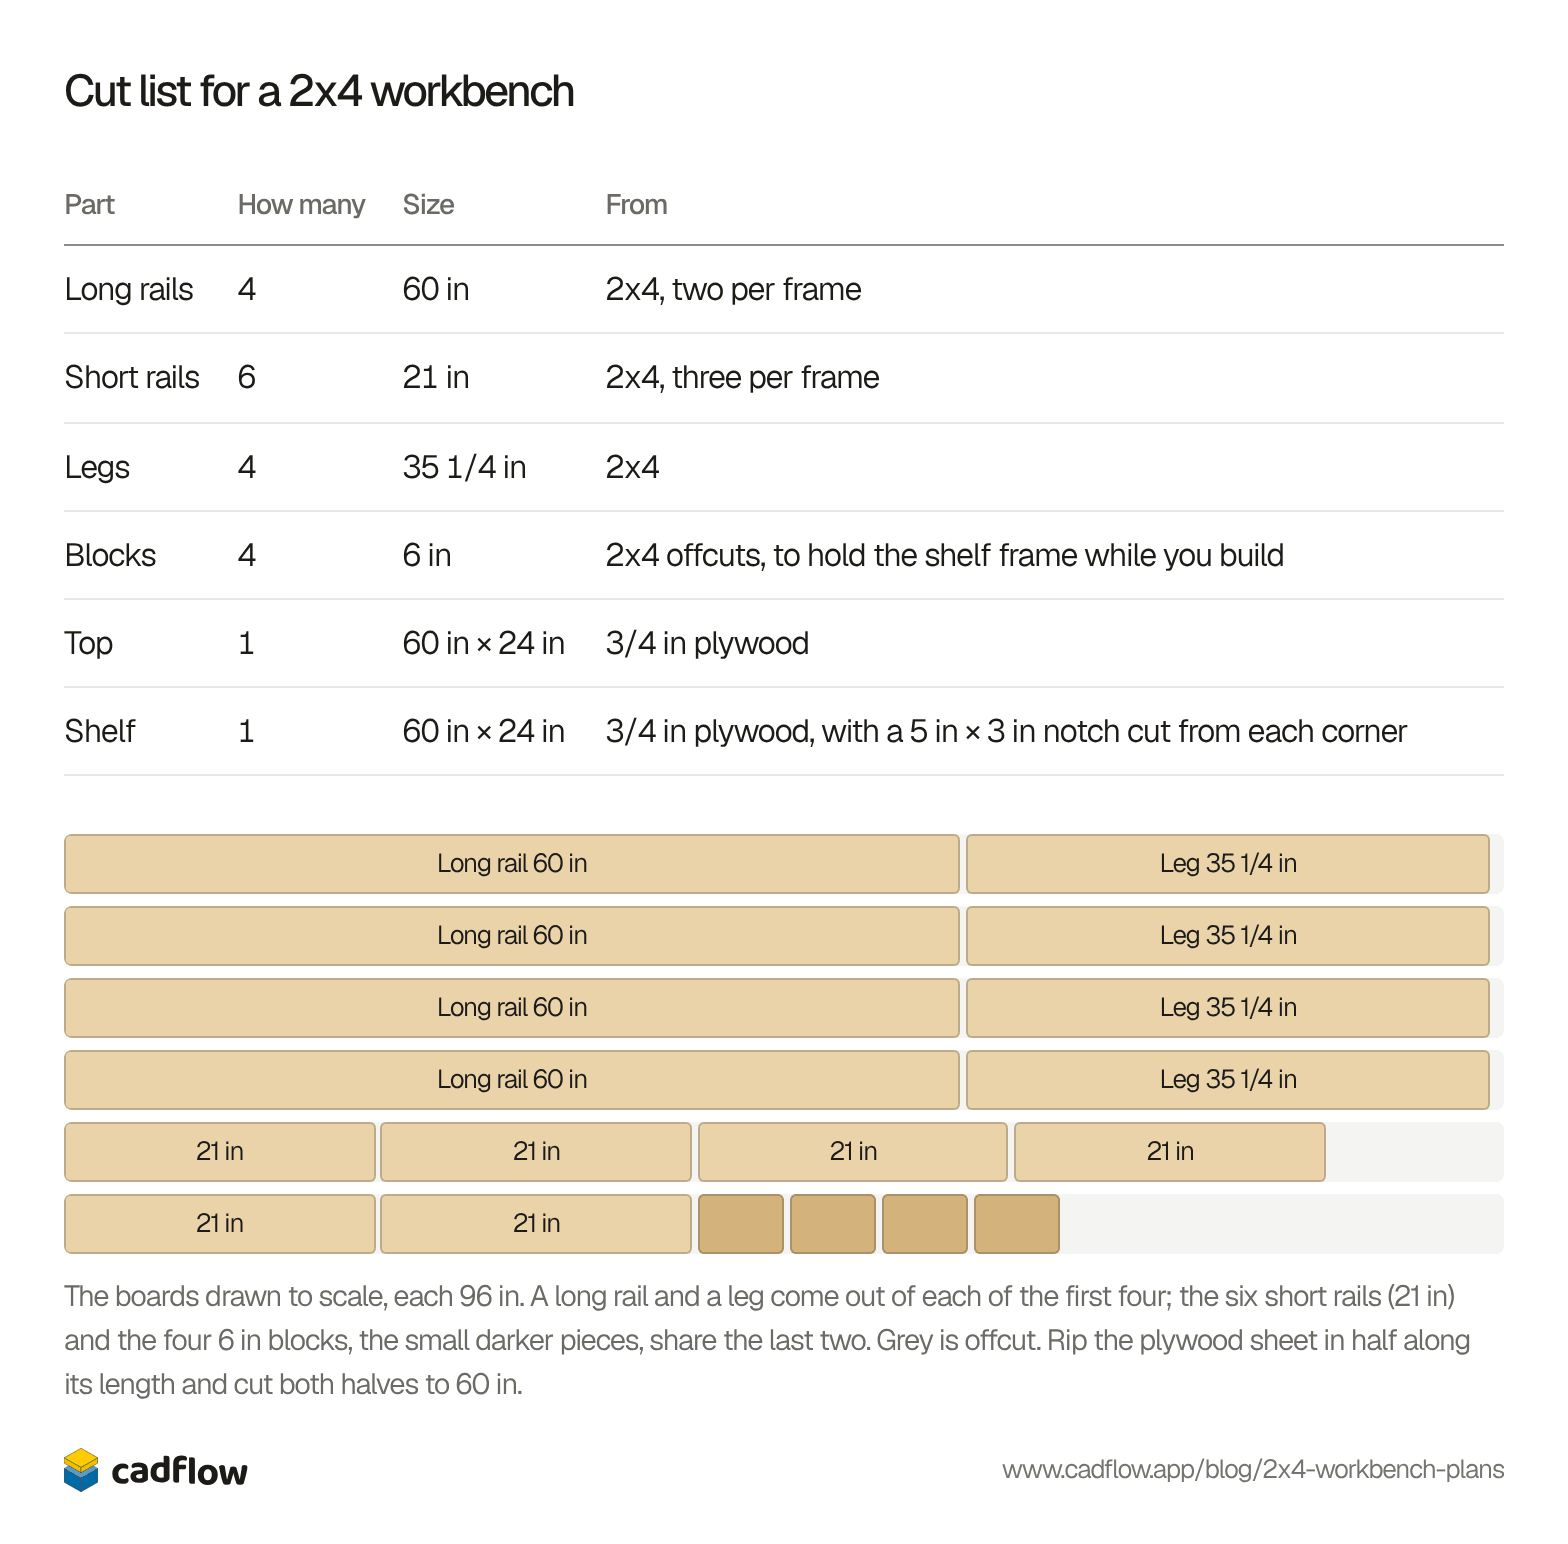
The boards drawn to scale, each 96 in. A long rail and a leg come out of each of the first four; the six short rails (21 in) and the four 6 in blocks, the small darker pieces, share the last two. Grey is offcut. Rip the plywood sheet in half along its length and cut both halves to 60 in.
| Part | How many | Size | From |
|---|---|---|---|
| Long rails | 4 | 1500 mm | 45 × 95 mm stud, two per frame |
| Short rails | 6 | 510 mm | 45 × 95 mm stud, three per frame |
| Legs | 4 | 882 mm | 45 × 95 mm stud |
| Blocks | 4 | 150 mm | 45 × 95 mm stud offcuts, to hold the shelf frame while you build |
| Top | 1 | 1500 mm × 600 mm | 18 mm plywood |
| Shelf | 1 | 1500 mm × 600 mm | 18 mm plywood, with a 140 mm × 90 mm notch cut from each corner |
The boards drawn to scale, each 2400 mm. A long rail and a leg come out of each of the first four; the six short rails (510 mm) and the four 150 mm blocks, the small darker pieces, share the last two. Grey is offcut. Rip the plywood sheet in half along its length and cut both halves to 1500 mm.
Measure your boards before you cut. The plan assumes a 2x4 is 1 1/2 by 3 1/2 inches (or 45 by 95 mm), and the short rails and the notches depend on it. With other studs, a short rail is the bench’s depth minus two stud thicknesses, and each notch is a stud’s thickness plus its width along the bench, and two thicknesses across it.
In the metric version, a long rail and a leg take 2385 mm of a 2.4 m board with one cut between them, so check that your boards really are 2.4 m. If they come up short, take the same few millimetres off all four legs.
How to build it
1. Build the shelf frame
Lay the two long rails on edge on the floor, with the three short rails between them: one at each end and one in the middle. Drill pilot holes and drive two rail screws through the long rail into the end of each short rail. Before you tighten the last ones, measure the frame’s two diagonals and push the corners untill both measurements are the same, which means the frame is square. Then set it on the four blocks, two under each long rail, a little in from the ends.
2. Screw the shelf on
With the jigsaw, cut a notch out of each corner of one plywood half, the size in the cut list. Lay it on the frame with its edges flush with the frame’s edges, and screw it down with the short screws every 8 inches (200 mm) around the edge and along the middle rail. The notches line up with the frame’s inside corners, which is where the legs go.
3. Stand the legs in the corners
Stand a leg in each notch with its foot on the floor, its wide face against the long rail and its narrow edge against the end rail. Check with the square that it’s upright, then screw it to the long rail with two leg screws and to the end rail with two more. The leg screws are shorter than the rail screws so they don’t come out the far side of the leg.
4. Lower the top frame on
Build the top frame the same way as the shelf frame, on the floor. Lift it over the four legs, which is easier with a second person, and push it down until its top edges are flush with the tops of the legs. Clamp it there, check that the legs are still upright, and screw each leg to the frame the way you did at the bottom.
5. Screw the top on
Lay the second plywood half on the top frame, edges flush, and screw it down the same way as the shelf. Countersink the screw heads a little below the surface, so they don’t scratch what you put on the bench.
6. Take out the blocks
Tip the bench toward you, slide the four blocks out from under the shelf frame, and set it back down. Round over the top’s edges with sandpaper, and it’s ready to use.
If it sways
Each leg is screwed to both frames, at two heights and in two directions, so the bench stands firm for assembly and most sawing. The plywood keeps each frame from folding into a parallelogram when you push the top sideways. What screws can’t fully stop is the whole bench leaning end to end when you push hard along it, for example when you plane a board, because a screwed corner can still turn a little.
If you feel that, screw a panel of 1/2 inch (12 mm) plywood across the back, over the back rails of both frames. A flat sheet can’t lean, so the bench can’t lean either.
Changing the size
To make it taller or lower, change only the legs. Lower suits hand planing, where you push your weight down onto the plane; higher suits fine work you want close to your eyes.
To make it longer or shorter, change the long rails and the plywood. In our opinion, past about 6 feet (1800 mm) the bench wants a third pair of legs in the middle, because the 2x4 rails start to sag over a long span. To make it deeper, change the short rails and the plywood; a sheet of plywood gives you two pieces up to 24 inches deep (600 mm in the metric version).
Plans like these in CadFlow
We make CadFlow, a 3D program for things you build, which plays the build back as a step-by-step video that anyone can follow, like the model at the top of this page. It isn’t public yet. If you'd like to try it, join the waitlist.
Questions people ask
How much weight can this workbench hold?
We haven't tested it to breaking, so we won't put a number on it. The load on the top goes through the plywood into the frame and down the legs to the floor, and each leg is held by eight screws. Pushing sideways, not weight, is what this kind of bench is weakest against; the panel under "If it sways" fixes that.
Can I build it from 2x6s or 2x3s?
Yes. Recalculate the short rails (the depth minus two stud thicknesses) and the shelf's notches (a stud's thickness plus its width along the bench, and two thicknesses across it). With 2x6s the frames get taller, so the space between the shelf and the top gets smaller.
Do I need glue?
No, the screws hold it. Glue in the frame corners makes them stiffer, but then you can't take the bench apart to move it.
How tall should a workbench be?
This one is 36 inches (900 mm in the metric version). Change the legs to suit you: a lower bench is better for hand planing and heavy work, a higher one for small, detailed work.
Free tools for this
History of this post
- Published
Read next
Raised garden bed plans: a 4 × 8 ft bed from nine 2x6s
30 types of wood for building and furniture, compared
Metric bolt size chart: spanner and hex key sizes, M2 to M24


This blog is by the team making CadFlow, where you build your project in 3D and show how it goes together.
See how CadFlow works